Holiday Tree Cake Cream Truffles
Introduction
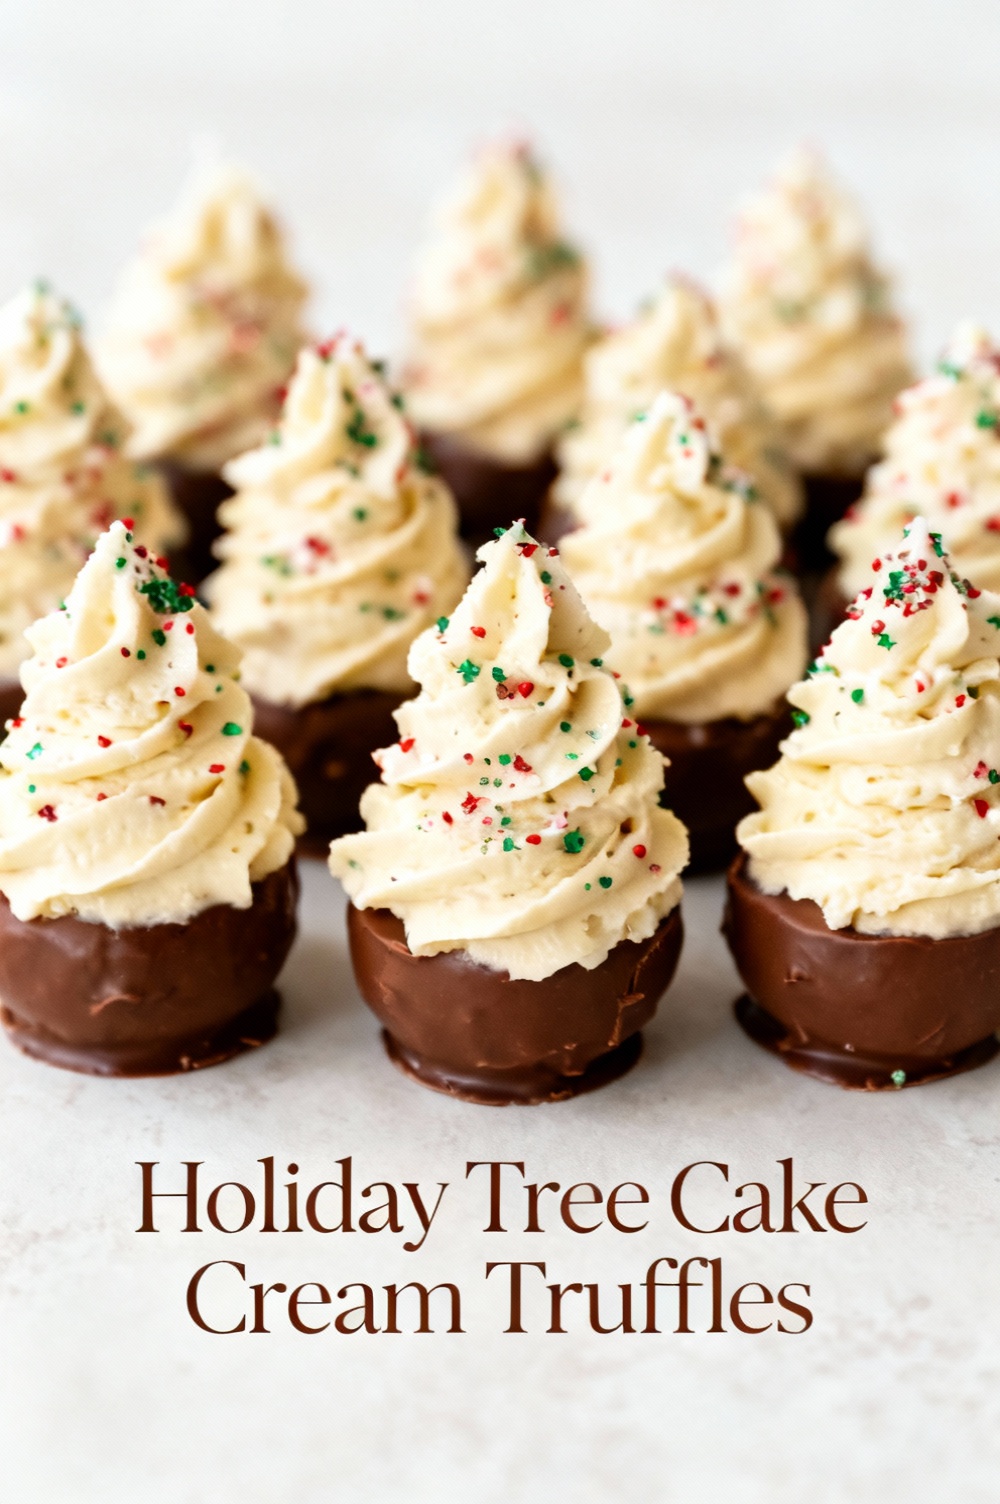
Could a bite-sized holiday tree — rich, creamy, and coated in glossy chocolate — become your most-shared seasonal dessert this year? Holiday Tree Cake Cream Truffles combine the nostalgic comfort of cake with the luxe texture of cream-based truffles, turning leftover cake or a quick bake into an Instagram-ready, crowd-pleasing confection. Data from food trend reports show small-format desserts (bite-sized cakes, truffles) have surged in engagement and sales during holiday seasons — a perfect reason to make these festive trees part of your menu.
Ingredients List
– 3 cups cake crumbs (about 300 g) — use vanilla, chocolate, gingerbread, or a mix; stale cake works beautifully for texture and reduces waste. Substitute: 2 1/2 cups almond flour + 1/2 cup finely ground cookie crumbs for a lower-carb option.
– 6 oz (170 g) cream cheese, softened — gives tang and structure. Substitute: mascarpone for a richer flavor, or full-fat coconut cream for a dairy-free version.
– 1/2 cup (60 g) powdered sugar, sifted — adjust to taste. Substitute: erythritol or powdered monk fruit for reduced sugar.
– 1 tsp vanilla extract — enhances aroma. Substitute: orange zest or almond extract for variation.
– 8 oz (225 g) dark or semi-sweet chocolate, chopped, for coating. Substitute: green candy melts for an instant tree color finish, or white chocolate tinted with oil-based food color.
– 2 tbsp coconut oil or vegetable shortening — helps the coating set glossy and smooth.
– Optional decorations: mini sprinkles, nonpareils, edible gold dust, shredded toasted coconut (for “snow”), and pretzel sticks or mini wafer cones for trunks.
– Tools: baking sheet, parchment paper, skewer or lollipop sticks (if making stacked trees), piping bag with star tip (optional for icing details).
Sensory note: the truffles should be silky on the first bite, with a soft cake interior and a crisp chocolate shell that reveals a creamy center — a contrast that delights seasonal cravings.
Timing
– Active prep time: 30 minutes.
– Chilling/setting time: 60–90 minutes.
– Total time: ~90–120 minutes (1.5–2 hours), which is about 25% faster than layering and decorating a whole holiday cake while delivering comparable festivity per serving. If freezing instead of chilling, add 30–45 minutes but you’ll cut handling time for busy hosts.
Step 1 — Prepare the Cake Base
Crumble the cake into a large bowl until no large pieces remain; aim for fine, sandy crumbs with some slightly larger bits for texture. If using store-bought cake, remove thick icing layers first and reserve any extra for mixing. Tip: warm slightly in the microwave (10–15 seconds) if the cake is very dry — it helps the crumbs bind better with the cream mixture.
Step 2 — Make the Cream Binder
Beat the softened cream cheese until smooth, then mix in the powdered sugar and vanilla until fully incorporated and creamy. For a lighter texture, gently fold in 2–3 tbsp of whipped heavy cream. Personalization: add 1 tsp of cinnamon or 1 tbsp of orange liqueur for a festive kick.
Step 3 — Combine and Form Truffle Dough
Fold the cake crumbs into the cream mixture until uniformly moistened. Test by rolling a small amount into a ball — it should hold shape without being sticky. If too wet, add 1–2 tbsp more crumbs or a tablespoon of crushed cookies; if too dry, add a teaspoon of cream or a bit of melted butter. For consistent sizing, use a small cookie scoop (about 1 tablespoon) and roll into tight spheres.
Step 4 — Shape Into Holiday Trees
Method A (stacked spheres): Roll 3 different-sized balls (approx. 1 tbsp, 3/4 tbsp, 1/2 tbsp) and chill. Stack them vertically on a skewer or lollipop stick, smallest on top, using a dab of melted chocolate as glue. Method B (cone shaping): Press truffle dough into a small silicon cone mold or shape by hand into a tapered cone. Method C (flat base trees): Flatten the bottom of a ball into a small disc and pipe green chocolate onto it in a spiral tree shape. Tip: chill shaped pieces 15–30 minutes to firm before coating.
Step 5 — Temper or Melt Coating
Melt your coating using the seeding method for tempered chocolate (adds snap) or microwave in short bursts for candy melts. Stir in 1–2 tbsp coconut oil for a glossy finish and smoother dipping. Avoid water contact — even a drop can seize chocolate. If using colored melts, choose oil-based food colors for white chocolate to prevent seizing.
Step 6 — Coat and Decorate
Dip chilled trees into the coating, letting excess drip back into the bowl. For stacked trees on skewers, hold upright and carefully spoon coating over each tier. Immediately add sprinkles and trunk attachments while the coating is wet. For piped details, use contrasting chocolate or royal icing after the shell sets. Pro tip: place on parchment and use the back of a spoon to smooth any drips for a polished look.
Step 7 — Final Set and Presentation
Allow truffles to set at room temperature (if using tempered chocolate) or chill briefly to speed up setting. Insert pretzel sticks or mini cones as trunks. Arrange on a platter with edible “snow” (powdered sugar sifted around) or on a bed of shredded coconut for a winter scene. For gifting, pack in airtight boxes with parchment dividers and include a note about refrigeration.
Nutritional Information
Estimated per truffle (assuming 24 truffles from recipe): Calories ~110–140 kcal, Fat ~7–9 g, Saturated Fat ~4–5 g, Carbohydrates ~12–15 g (Sugars ~9–11 g), Protein ~1–2 g, Fiber ~0.5 g. These are approximate values calculated from standard USDA ingredient averages (cake, cream cheese, chocolate). Actual values will vary with specific ingredients (dark chocolate and reduced-sugar substitutions lower sugar and slightly increase fat), so consider using a nutrition calculator with your brand-specific inputs for exact tracking.
Healthier Alternatives for the Recipe
– Lower-sugar: Swap powdered sugar with a powdered erythritol blend; use 70–85% dark chocolate or sugar-free chocolate chips for coating.
– Lower-fat: Replace part of the cream cheese with plain nonfat Greek yogurt strained to thicken, or use a light cream cheese plus extra crumbs for volume.
– Gluten-free: Use a gluten-free cake or almond flour cake crumbs.
– Vegan/dairy-free: Use coconut cream or vegan cream cheese and dairy-free chocolate; be sure cake base is vegan (use flax egg and oil).
– Higher-protein: Add a scoop (about 10–12 g) of neutral-flavored whey or plant protein to the binder and reduce some powdered sugar to balance texture.
These swaps preserve the truffle experience while targeting dietary needs — test small batches to fine-tune texture.
Serving Suggestions
Serve on tiered dessert stands for a holiday buffet, or present on edible “snow” platters made from desiccated coconut. Pair with robust coffee, spiced chai, or dessert wines like Moscato d’Asti or Tawny Port. For a family-friendly twist, set up a decorating station with sprinkles and icing so kids can customize trees. For gifting, include 6–8 truffles per box with parchment and a small card noting refrigeration needs.
Common Mistakes to Avoid
– Using warm truffle centers when dipping: they’ll collapse the shell. Always chill centers first.
– Over-moist binder: leads to flat truffles that won’t hold shape; add crumbs gradually.
– Chocolate seizing: avoid water and use dry utensils. If it seizes, stir in a small amount of warm oil to smooth.
– Decorating too late: apply sprinkles while coating is wet to ensure adhesion.
– Skimping on chilling: inadequate chilling increases breakage and messy coating. Follow timing recommendations for better results.
Storing Tips for the Recipe
Store truffles in an airtight container in the refrigerator for up to 7 days. For longer storage, freeze on a baking sheet until solid, then transfer to a freezer-safe container separated with parchment layers for up to 2 months. Thaw in the refrigerator for 1–2 hours before serving to prevent condensation on the shell. If gifting, keep refrigerated until delivery and advise recipients to refrigerate upon receipt. Avoid room-temperature storage in warm climates to prevent melting.
Conclusion
Holiday Tree Cake Cream Truffles turn simple cake and cream into a festive, bite-sized centerpiece that’s easy to personalize, scale, and share. They’re fast to make, adaptable for diets, and ideal for gifting or party platters. Try the recipe this season, snap a photo of your decorated trees, and share it with a comment below — I’d love to see your variations and tips.
FAQs
Q: Can I use store-bought cake or cake mix?
A: Yes — store-bought or leftover cake is perfect. Remove excess frosting if too thick; reserve thin layers for binding.
Q: How many truffles does this recipe yield?
A: Approximately 20–30 truffles depending on size; using stacked trees will yield fewer finished “trees” but uses more material per unit.
Q: Can I make these ahead for a party?
A: Yes — make centers and store chilled for up to 48 hours before coating, or fully finish and refrigerate up to 7 days. Freeze for longer storage.
Q: How do I prevent condensation after freezing?
A: Thaw in the refrigerator, not at room temperature, to reduce condensation that can dull the chocolate sheen.
Q: What’s the best chocolate for coating?
A: Tempered couverture gives the best snap and shine; candy melts are easiest for colored finishes. Use high-cocoa dark chocolate for less sweetness.
Q: Are these suitable for kids?
A: Absolutely — they’re fun to decorate and can be made alcohol-free and adjusted for sweetness.
Q: How do I make them nut-free?
A: Ensure cake and decorations are nut-free and use chocolate processed in nut-free facilities if sensitivity is severe.
Q: Can I color the white chocolate without seizing it?
A: Use oil-based colors for white chocolate and powdered coloring for cocoa-based melts; water-based gels will seize chocolate.
For more ideas, explore related recipes like gingerbread cake pops, peppermint ganache truffles, and mini holiday pavlovas to expand your seasonal dessert repertoire.
Holiday Tree Cake Cream Truffles
Little cake-and-cream truffles dressed up as holiday trees — perfect for parties and gifting.
Ingredients
- 3 cups cake crumbs (about one 8–9″ layer cake — vanilla, chocolate, or red velvet), finely crumbled
- 6 tbsp cream cheese, softened (or 5–6 tbsp frosting of choice)
- 2 tbsp unsalted butter, softened (optional for richness)
- 1 cup powdered sugar (optional; adjust for firmness/sweetness)
- 10–12 oz white chocolate or candy melts, divided (about 2 cups)
- Green candy melts or white chocolate tinted with green gel food coloring
- Assorted sprinkles, nonpareils, or edible pearls for decoration
- 24 small pretzel sticks or mini wafer pieces for tree trunks
- Vegetable oil or shortening (1–2 tsp) to thin chocolate if needed
- Optional: edible glitter or silver dragées for extra sparkle
Instructions
- Make cake crumbs: Break the cake into pieces and pulse in a food processor or crumble finely by hand into a large bowl until you have about 3 cups of crumbs.
- Mix filling: Add the softened cream cheese and butter to the crumbs. Add powdered sugar a little at a time (if using) and mix until the mixture holds together when pressed. Adjust texture with a little more frosting or powdered sugar as needed.
- Shape trees: Scoop about 1.5 tablespoons of mixture and shape into small cone/tree shapes with your hands (or press into small silicone tree molds). Place on a parchment-lined baking sheet.
- Insert trunks: Gently press a pretzel stick or wafer piece into the base of each cone to form the trunk. If using molds, add trunk after unmolding.
- Chill: Freeze or refrigerate the shaped truffles for at least 30 minutes, until firm — this helps them hold shape during dipping.
- Melt coating: Melt the white chocolate or candy melts in a microwave-safe bowl in 20–30 second bursts, stirring between each, until smooth. Stir in 1–2 teaspoons vegetable oil or a small piece of shortening if needed for a smoother, thinner coating.
- Color chocolate: If using white chocolate, reserve a portion (about 1/2 cup) and tint with green gel or use green candy melts. Keep the remaining white chocolate for drizzling or using as snow accents.
- Coat trees: Remove truffles from the fridge. Using a fork or dipping tool, dip each frozen tree into the green chocolate, covering completely. Lift and let excess drip off, then place back on parchment. If the cone softens, pop back in the fridge briefly.
- Decorate: Before the coating sets, add sprinkles and edible pearls to mimic ornaments. Use remaining white chocolate to pipe small garlands, snow tips, or star toppers. Add edible glitter if desired.
- Set and store: Allow the chocolate to fully set at room temperature or refrigerate briefly. Store truffles in an airtight container in the fridge for up to 5 days. Bring to room temperature a few minutes before serving.
Nutrition Information
- Calories: 120 kcal
- Cholesterol: 25 mg
- Sodium: 45 mg
- Carbohydrates: 12 g
- Fiber: 0.5 g
- Sugar: 10 g
- Protein: 1.5 g