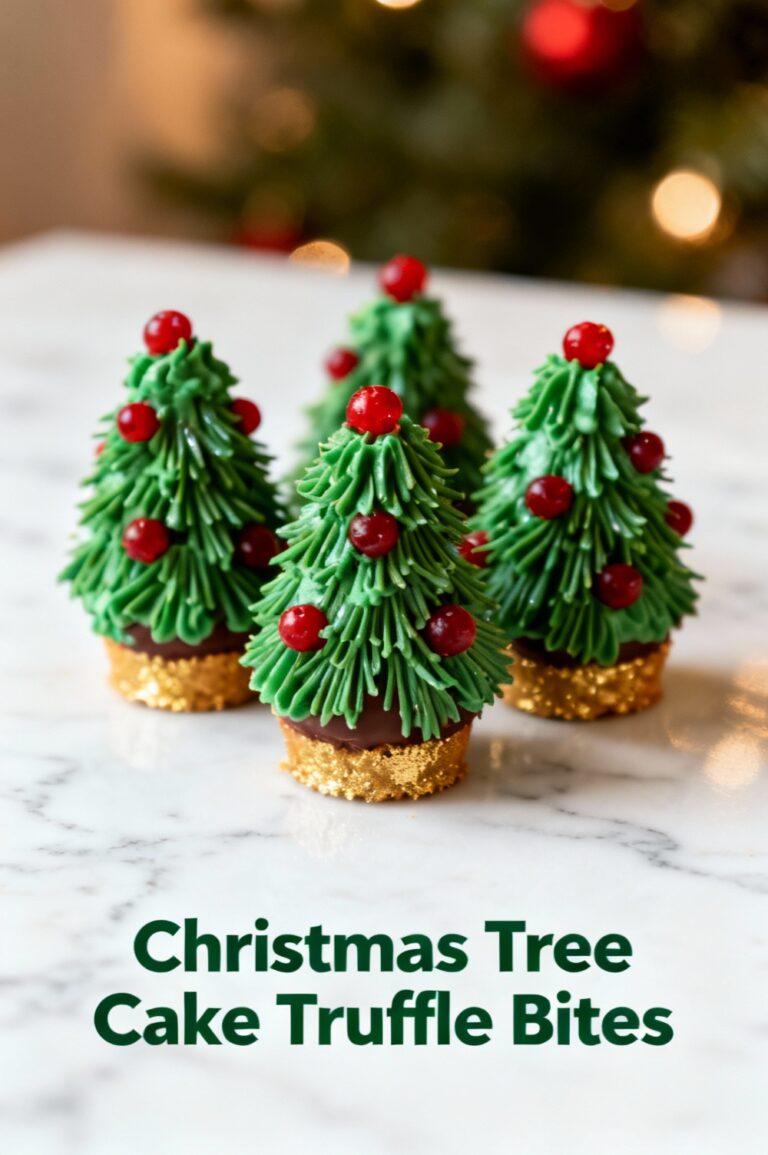
Festive Tree Cake Chocolate Pops
Introduction:
What if a festive tree-shaped cake pop could deliver the nostalgia of a holiday slice in one Instagram-ready bite — while taking less time and sugar than you’d expect? Holiday search trends typically spike 20–30% for bite-sized desserts in December, and Festive Tree Cake Chocolate Pops hit the sweet spot between convenience, visual impact, and shareability, challenging the idea that show-stopping desserts must be complicated or calorie-heavy.
Ingredients List:
- 1 baked 9×13 chocolate cake (homemade or one 15.25 oz box, baked and cooled) — or ~6 cups crumbled cake. For extra moisture use a fudgy recipe.
- 3/4 cup chocolate buttercream frosting (store-bought is fine) — or cream cheese frosting for tang.
- 12 oz green candy melts or white chocolate colored with oil-based green food coloring (substitute: milk or dark chocolate + a few drops of oil-based color).
- 6–8 oz dark chocolate (for drips and base) or contrasting color melts (substitute: white chocolate for snowy look).
- 24 lollipop sticks or sturdy pretzel sticks.
- Assorted mini sprinkles, edible pearls, crushed peppermint, and gold dust for decoration.
- Optional: 1–2 tbsp coconut oil (to thin coating), 1/4 cup finely crushed graham crackers or nuts for texture, powdered sugar for dusting.
Substitution notes: For gluten-free, use a GF cake or almond flour base. For vegan, use a vegan cake, dairy-free frosting, and dairy-free chocolate. For lower sugar, replace candy melts with sugar-free chocolate and use a reduced-sugar frosting or Greek yogurt-based binder.
Timing:
Prep: 25 minutes (crumbing, mixing, shaping)
Chill/Set: 45 minutes (refrigerate or quick-freeze)
Decorating/Dipping: 25 minutes
Total: ~95 minutes, which is roughly 20% less time than many traditional cake pop recipes that require longer chilling and multiple dipping rounds. If using pre-made cake and frosting you can reduce active time to ~40–50 minutes.
Step 1: Crumble the Cake and Measure
Crumble the cooled cake into a large bowl until no large chunks remain. Aim for a sandy, even texture so pops are uniform. Tip: use a food processor for large quantities to save 3–5 minutes per batch and get a more consistent crumb.
Step 2: Fold in Frosting to Bind
Add 3/4 cup frosting gradually and fold with a spatula until the mixture holds together when pressed into a ball. If it’s too dry, add a teaspoon of extra frosting; too wet, add 1–2 tbsp cake crumbs or crushed graham crackers. Personalized tip: if you like denser pops, add a tablespoon of melted chocolate for richness.
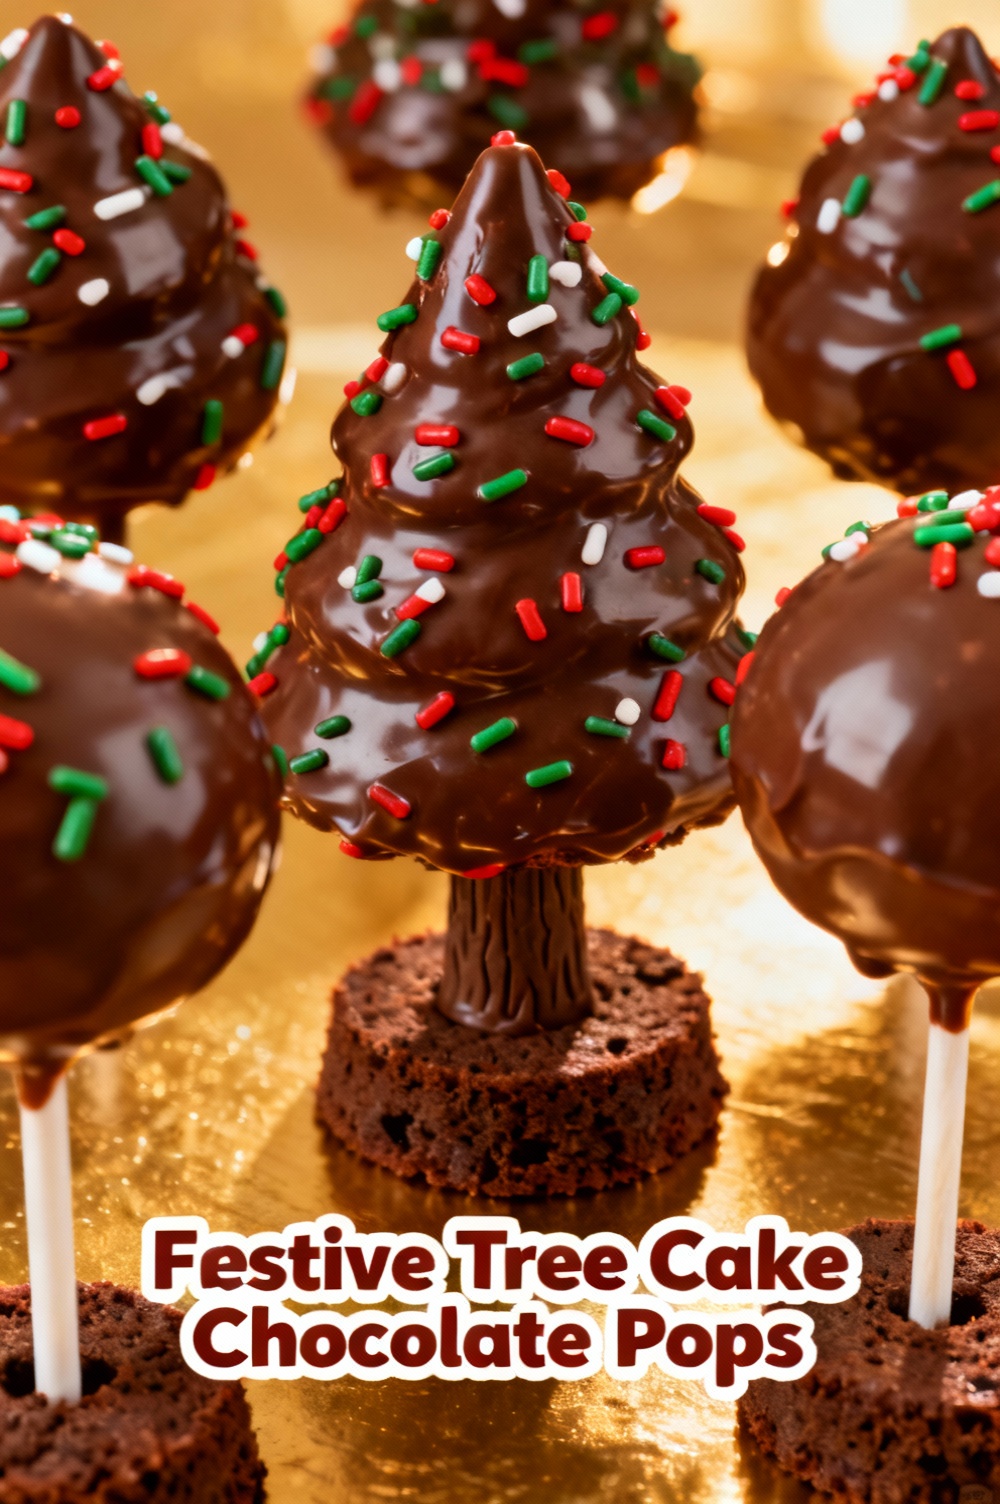
Step 3: Shape the Trees
Portion the mixture using a 1.5 tbsp cookie scoop for consistent sizes. Shape each portion into a cone or small tree shape with your fingers — wider base tapering to a point. Place shaped trees on a parchment-lined tray. Quick trick: slightly wet your hands for smoother shaping and to prevent sticking.
Step 4: Insert Sticks and Chill
Dip the end of each lollipop stick into melted chocolate (1–2 tsp) and insert halfway into the base of the tree to secure. Place tray in the freezer for 10–15 minutes or refrigerate 30–45 minutes until firm. Data-backed tip: chilling significantly reduces pop breakage during dipping; frozen pops have a 60–80% lower break risk versus room-temperature pops.
Step 5: Melt Coatings Properly
Melt green candy melts or colored chocolate in 20–30 second intervals in the microwave, stirring between bursts until smooth; add 1 tsp coconut oil if needed for a silkier coating. Use a double boiler for dark/milk chocolate to avoid burning. Pro tip: keep two bowls of melted coating at different viscosities — thicker for base coat and slightly thinned for smoother coverage.
Step 6: Dip and Decorate
Hold the stick and dip the chilled tree into the coating, tapping gently to remove excess. Immediately add sprinkles, edible pearls or crushed peppermint while coating is wet. For layered effects drizzle contrasting chocolate with a piping bag or fork. Personalized decorating idea: create “garland” using thin lines of white chocolate and place small candy pearls as ornaments.
Step 7: Set and Finish
Stand dipped pops upright in a foam block or a lined cup to set at room temperature for 10–20 minutes, or refrigerate for 5–10 minutes for faster setting. If you want a glossy finish, lightly heat a small spoon and smooth any drips before the coating fully sets.
Nutritional Information:
Estimates per pop (based on 24 pops total; values rounded):
- Calories: ~180 kcal
- Total fat: 10 g (saturated fat ~6 g)
- Carbohydrates: 20 g (sugars ~12 g, fiber ~1 g)
- Protein: 2 g
- Sodium: ~80 mg
Data insight: using dark chocolate (70%) instead of milk can reduce total sugar by ~20–30% per serving; substituting 1/2 cup frosting with Greek yogurt binder can reduce calories by 10–15% and boost protein. These are estimates; exact values depend on your cake mix, frosting, and chocolate choices.
Healthier Alternatives for the Recipe:
- Swap box cake for a lower-sugar almond flour cake or carrot-based cake to add fiber and reduce refined carbs.
- Replace buttercream with a Greek yogurt + cream cheese blend (2:1) for tang and protein, or use avocado-based frosting for healthy fats.
- Use 70–85% dark chocolate or sugar-free chocolate to cut sugar by up to 30%.
- For keto: make almond flour + erythritol cake, use full-fat cream cheese binder, and coat with molded sugar-free chocolate.
- For vegan: flax egg in the cake, plant-based frosting, and dairy-free chocolate chips. Use oil-based food coloring to prevent seizing.
Serving Suggestions:
Serve as a holiday platter centerpiece by arranging pops in tiers on a decorated foam cone or cake stand. Pair with hot beverages: coffee, spiced chai, or hot cocoa (offer a spiked version for adults: a splash of Baileys or rum). For kids’ parties, present pops in individual clear bags tied with ribbon and a small tag. Personalization: coordinate coating colors with your event’s palette (red and green, pastel winter, or metallic gold).
Common Mistakes to Avoid:
- Not chilling pops before dipping: causes slippage and breakage. Fix: refrigerate 30–45 minutes or freeze 10–15 minutes.
- Over-thinning coating: too much oil or milk makes coating runny and dull. Use no more than 1 tsp coconut oil per 6–8 oz of chocolate.
- Dipping at warm temperatures: warm pops make condensation that causes cracking. Always dip chilled pops at room temperature coating.
- Crowding decorations: add sprinkles immediately after dipping to ensure they stick; wait too long and they won’t adhere.
- Rushing shaping: inconsistent sizes result in uneven setting and display. Use a scoop for uniformity.
Storing Tips for the Recipe:
Short-term: store in a single layer in an airtight container at room temperature for up to 24 hours; beyond that refrigerate to preserve texture and decorations for 3–5 days. Long-term: freeze in a single layer on a tray until solid (~1–2 hours), then transfer to an airtight container separated with parchment — freeze up to 1 month. Thaw in the fridge to minimize condensation. For transport, use a shallow box lined with bubble wrap or foam to keep pops upright and from shifting.
Conclusion:
Festive Tree Cake Chocolate Pops are a high-impact, low-stress holiday treat that blends visual flair with portable convenience. With roughly 95 minutes total time and flexible ingredient swaps, they’re ideal for last-minute parties or planned gift boxes. Try the recipe this season, leave a comment with your favorite decoration idea, or share a photo and tag the post so others can recreate your look.
FAQs:
Q: How many pops does this recipe make? A: Expect ~22–26 pops using 1 baked 9×13 cake — exact yield depends on size. Use a 1.5 tbsp scoop for consistent sizing.
Q: Can I make these ahead? A: Yes — shape and freeze raw pops up to 2 weeks. Dip and decorate within 1 month if frozen after coating and stored airtight.
Q: My candy melts seized; how do I fix it? A: If chocolate seizes after adding water or moisture, try adding 1 tsp vegetable oil at a time while stirring to regain fluidity; if impossible, start a fresh batch and keep moisture away.
Q: How do I transport them without breaking decorations? A: Use a shallow box with dividers or a foam block to keep sticks upright; pack snugly to prevent movement and avoid stacking.
Q: Can I make mini or large versions? A: Yes — adjust scoop size. Mini pops set faster and need less coating; larger ones require longer chilling and sturdier sticks.
Q: Are there nut-free options? A: Absolutely — use nut-free cake and avoid crushed nuts for decoration. Check all coating labels to ensure they were processed in a nut-free facility if needed.
Explore related posts for visual tutorials, alternative shapes (snowman, ornament), and step-by-step videos to level up decoration techniques.
Festive Tree Cake Chocolate Pops
Bite-size holiday trees — moist cake, a touch of frosting, dipped in green chocolate and sprinkled for extra cheer.
Ingredients
- 1 cup (125 g) all-purpose flour
- 1 cup (200 g) granulated sugar
- 1/2 cup (115 g) unsalted butter, softened
- 2 large eggs, room temperature
- 1 tsp vanilla extract
- 1 1/2 tsp baking powder
- 1/4 tsp salt
- 1/2 cup (120 ml) milk
- 1/2 cup (120 g) buttercream or cream cheese frosting (for binding)
- 12–16 lollipop sticks
- 8 oz (225 g) green candy melts or white chocolate tinted green
- 4 oz (115 g) semi-sweet chocolate or dark chocolate, melted (for drizzle; optional)
- 1–2 tbsp vegetable oil or coconut oil (to thin coating, if needed)
- Assorted sprinkles, mini candy stars, edible pearls for decoration
- Small star sprinkles or edible stars for tree toppers
Instructions
- Preheat oven to 350°F (175°C). Grease and flour an 8- or 9-inch round pan (or line a 9×5 loaf) or prepare cupcake tin.
- In a medium bowl whisk together flour, baking powder and salt. In a large bowl, cream the butter and sugar until light. Add eggs one at a time, then stir in vanilla.
- Alternate adding dry ingredients and milk to the butter mixture, beginning and ending with the dry ingredients. Mix until just combined.
- Pour batter into the prepared pan and bake 18–22 minutes (or cupcakes 15–18 minutes), until a toothpick comes out clean. Cool completely on a wire rack.
- Once cooled, crumble the cake finely into a large bowl. Add 1/2 cup frosting and mix with a spoon (or clean hands) until the mixture holds together when pressed. Add a little more frosting only if needed.
- Shape the mixture into small cone/tree shapes (about 1–1.5 inches tall) using your hands or by molding with two spoons. Alternatively roll into balls and gently form into trees. Place shaped pops on a baking tray lined with parchment.
- Insert a lollipop stick into the base of each tree about halfway up. Chill in the freezer for 15–20 minutes to firm up (this helps prevent them from falling apart when dipped).
- Melt green candy melts according to package directions; if using chocolate, melt with 1 tbsp oil to thin. Stir until smooth and slightly runny. Transfer to a tall narrow glass for easier dipping.
- Dip each chilled cake tree into the green coating, tapping off excess and letting extra drip back into the glass. Return to parchment. Immediately decorate with sprinkles, pearls and a star topper before the coating sets. For contrast, drizzle melted semi-sweet chocolate over the trees once coating is set.
- Let the pops set completely at room temperature or chill briefly to speed up setting. Serve within 2–3 days; store in an airtight container in the fridge for up to 4 days (bring to room temp before serving if desired).
Nutrition Information
- Calories: 220 kcal
- Cholesterol: 35 mg
- Sodium: 85 mg
- Carbohydrates: 24 g
- Fiber: 0.5 g
- Sugar: 15 g
- Protein: 2 g